1965-6 CHILDREN'S MODELS
THUNDERBIRD JR. - MUSTANG JR. - FIREBIRD - CHIEF INSTRUCTIONS
OPERATION
This electric motor driven car will travel at a fixed speed of about 5 miles per hour while the driver presses the foot pedal, stopping in about a car length when the foot pressure is removed.
Equipped with the battery we supply as original equipment, the car will travel about eight miles on one charging. Recharging is accomplished very easily and at nominal cost. (See instructions "TO RECHARGE BATTERY"). The running time may be extended by putting the car on charge during lunch, nap, school, etc,
The battery charge is a fixed amount of power which is used up by work done. The harder the motor has to work, the quicker the battery will be discharged. If the car is run on soft ground, grass, or up hill, it will not operate as long as if it were on a hard level surface. Similarly, it will not run as long with a 150 pound passenger as it will with a '75 pound one.
BATTERY
4
Use the best available heavy duty Group 2 GC or Group 3 6-volt battery, 140 ampere hours capacity or better. This is desirable to insure maximum running time on a charging and to reduce battery watering to a minimum. We supply as original equipment the Prestolite GC 2 Golf Cart Battery (capacity 160 amp. hours) which is specially designed for this service, (deep cycling)
TO INSTALL BATTERY
1. To remove body: (Thunderbird Jr. has front bumper attached to body.)
(Mustang Jr. has both bumpers attached to body.)
Disconnect body wiring connector plug, located under instrument panel to left of steering column,, by pulling the two halves apart. Remove four bolts fastening body to frame, located in lower edge of body just behind fender cut-outs. Slide body backward, against hub of steering wheel. Raise rear end carefully; then raise front end and remove.
2. To clamp battery in place:
Remove battery brackets. Insert battery into front end of frame, then turn into position with terminals located as indicated by diagram on floorboard. Replace battery brackets and tighten.
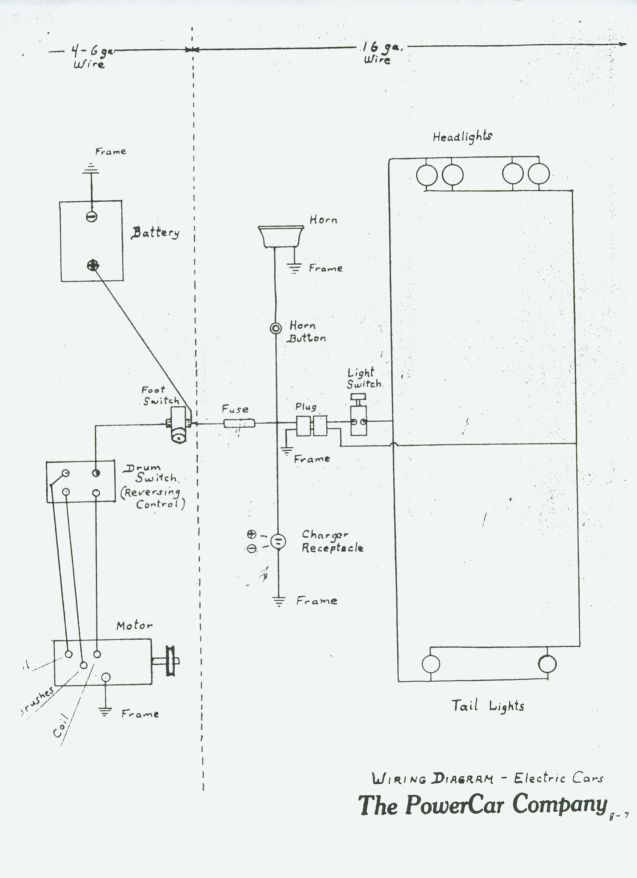
3. To avoid an accidental "short" between your tool and the car frame, first connect cable from foot switch to plus terminal; then connect cable from frame to negative terminal. These connections must have the correct polarity or charging connections will be wrong.
4. To replace body:
Holding rear end up, fit instrument panel onto steering shaft, as close to hub of steering wheel as possible. Lower rear end of body. Tuck side
panels back of edges of body as it comes down. Spring edges of body into position over the four mounting brackets and line up body holes with those in brackets. Insert the four bolts, each with a flat washer on the outside of the body, then fasten with lock-nuts. Tighten firmly but do not force, to avoid crushing the body plastic. Connect body wiring by pressing the two halves of the connector together.. Note that they will only join in one position. Tuck wire and plug out of way.
TO RECHARGE BATTERY
1. Insert polarized charger plug into receptacle located in the side panel in the cockpit. Plug other charger cord into any 115 volt AC outlet. Watch ammeter to make sure battery is properly connected. If battery connections are wrong, needle will travel to extreme right on dial, then return to zero, repeating this at intervals of perhaps half a minute, as the automatic circuit breaker operates. A proper connection will show a steady reading within the scale of the meter.
2. The charger operates initially at a maximum rate, then for a long period at a slightly lower rate, then drops off approximately 30% as the battery becomes completely charged. This action may be used as a convenient way to determine when the battery has been fully recharged. An appreciable drop in the "long" charging rate indicates a charged battery. Precise charging rates cannot be given, as they will depend on the local line voltage.
3. Generally, the charger should be plugged in after each use of the car and be left until the ammeter indicates the battery is fully recharged. When the battery is known to be substantially discharged the charger may be used for longer periods such as from before the evening meal until after breakfast. Overcharging should be avoided as it tends to dry out the battery and require frequent watering. A small electric light left on is a good reminder that the battery is on charge.
4. When water is needed, which will be only once in six months or more if the battery has not been overcharged, use only distilled water to assure maximum battery life.
STORING BATTERY
If the car is out of use for many weeks at a time, or in storage, be sure to keep the battery fully charge'd. A discharged battery deteriorates rapidly, especially in warm temperatures. A discharged battery is also subject to damage by freezing.
CAUTION
Battery fluid, which contains sulphuric acid, is corrosive and destructive. It may be neutralized by full strength household ammonia, old fashioned bleach water, or other alkaline. Make it a practice to keep the battery clean with a rag moistened with ammonia.
Corrosion of battery terminals may be kept to a minimum by coating them with grease or Vaseline before attaching cables and by adding more grease after they are attached.
FOOT PEDAL ADJUSTMENT
Position of the foot pedal may be changed to accomodate children of various heights. Three holes are provided in the floor boards for this purpose. Others may be drilled if needed.
LUBRICATION
1. Wheels: Each wheel has a ball bearing on each side. These may be oiled as needed.
2. Steering Mechanism: Ball bearings are located in the top and bottom of each front axle bracket; also in brackets at each end of the steering wheel shaft. These need lubrication infrequently because of the limited motion they serve. They may be taken care of with a drop or so of oil when needed.
3. Running Mechanism: There are two ball bearings in the speed reduction mechanism, one at each end of the intermediate shaft. Each of these is a precision bearing which has been packed with long lasting grease by the manufacturer. They should not require oiling for an indefinite period. However, the spacer washers associated with each bearing may receive a drop of oil occasionally to keep the mechanism free turning. This will keep battery current 'drain to a minimum. Washers separating the two 6" pulleys from the frame on each side of the rear axle should be oiled at the same time.
4. Motor: The motor is a modified Ford starter motor rated at 12 volts, but using 6 volts in this application. It has sintered bronze bushings with an oil content. These should receive a drop of oil when the motor is serviced for worn brushes. A couple of drops may be applied to the bushing at the shaft end without removing the motor. Once a year should be adequate for this application.
LIGHTS
- HORN - FUZEThe electric headlights and taillights are turned on and off by a pull switch on the instrument panel. In the "Firebird" and "Chief" models, there is a second switch, which controls the flashing red light. The fuze in the light and horn circuit is located in an insulated fuzed connector attached to the foot: pedal control switch.
MOTOR
The motor, a modified Ford starter unit, may be serviced by any service station equipped for starter and generator repair work. Brushes may be checked for wear perhaps once a year, if the car use is considerable.
CONTROL SWITCH (Foot Pedal)
This is a standard automotive starter switch. It may be replaced through the PowerCar Company or any auto parts supply house.
GEAR SHIFT
The hand lever on the floor operates an electric switch with FORWARD, NEUTRAL and REVERSE positions; Forward with lever left; backward with lever right; neutral with lever in center.
HAND BRAKE
The lever on the side is an emergency brake. Normally it will only be needed in descending steep grades.
BELL (Firebird and Fire Chief models)
To ring, lift weight on the pull-cord, then pull quickly.
WATER TANK - HOSE - NOZZLE (Firebird only)
To operate water pump: Remove pump from water tank by twisting handle counterclockwise. Pour in water not higher than 3/4 full. Replace pump and turn handle clockwise as far as possible so that cap is secured under ramp threads. Build up pressure by pumping until it works hard. Adjust nozzle for spray desired, turning counter clockwise for straight stream. Do not remove pump from tank until all pressure has been released.
BODY
The fiber-glass reinforced plastic body is rust-proof and durable, and will withstand blows which would dent a sheet metal body. However, it may be cracked or crushed by a heavy blow. The body represents a costly part of your car, and we urge you to protect your investment by giving it the best of care. The finish is a good synthetic enamel, which should be taken care of Just like the finish on any good car. A wax polish is very desirable.
CAUTION
These junior automobiles weigh about 190 pounds. This weight can inflict damage on other objects or the<car itself, just like a bigger vehicle. Particular care should be taken riot to run into curbs, stones or other obstacles which can inflict heavy punishment on front axles, body, etc.
If properly cared for, this unique vehicle will bring joy, knowledge and driving skill (which will be useful later on) for a long time. We are proud to be able to make it for the pleasure of our youngsters, and will appreciate receiving your comments and suggestions for improvement.
WHEN WRITING THE FACTORY ALWAYS GIVE THE SERIAL NUMBER OF YOUR CAR. WE MUST HAVE THIS NUMBER TO BE SURE OF FURNISHING CORRECT PARTS.
The POWERCAR Company Mystic, Connecticut, U.S.A.
- 4 -
Sept.10, 1964